Keeping your mini fridge clean and well-maintained is essential to ensure it functions efficiently and lasts longer. One crucial maintenance task you shouldn’t ignore is cleaning the condenser coils. Most people usually skip this step as they don’t even know that you’re supposed to clean it. But if you’re here it means you’re a good mini fridge owner, and I will guide you step by step on how to clean the condenser coils in your mini fridge. The best part about this process is that it is straightforward and beginner-friendly. So let’s dive it!
Step 1: Prepare your mini fridge
Before you begin cleaning, make sure to unplug the mini fridge from the power source. This ensures your safety and prevents any electrical accidents during the cleaning process. Also, remove any items from inside the fridge to give you better access to the coils.
Step 2: Locate the condenser coils
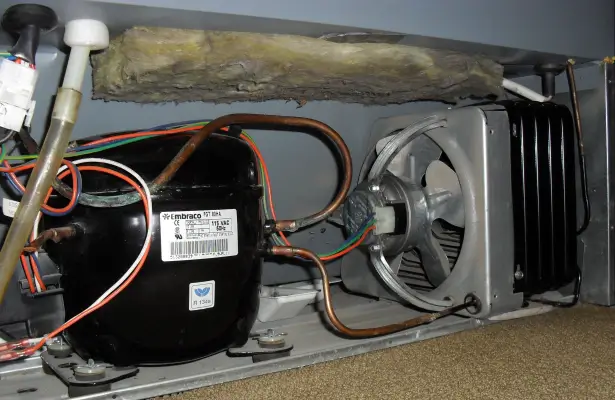
The condenser coils are typically located at the back or bottom of the mini fridge. Refer to the user manual if you’re unsure about their exact placement. They are usually behind a removable panel or grille. If you haven’t cleaned yours in a while (or never) it will probably look full of dust. Not as clean as the photo.
Step 3: Remove the panel or grille gently

Remove the panel or grille that covers the condenser coils. It may be held in place by screws or clips. Use a screwdriver or your hands, depending on the type of fasteners used. Keep the screws or clips in a safe place to avoid misplacing them.
Step 4: Vacuum cleaning
Using a vacuum cleaner with a soft brush attachment, carefully clean the accumulated dust and debris from the condenser coils. Move the brush gently over the coils, making sure to reach all the nooks and crannies. Take your time to ensure thorough cleaning. The vacuum cleaner will help suck up the loosened dirt, preventing it from spreading elsewhere.
Step 5: Finishing touches
After vacuuming, take a damp cloth or sponge and wipe down the condenser coils and surrounding area to remove any remaining dust or residue. Be cautious not to apply excessive moisture to the coils or other electrical components.
Step 6: Reassemble the mini fridge
Once you finish cleaning the coils, carefully reattach the panel or grille you removed earlier. Make sure it is securely in place, using the same screws or clips. Double-check that all the fasteners are tightened properly.
Step 7: Plug your mini fridge back in
With the condenser coils now clean and the mini fridge reassembled, plug it back into the power source. Give it a few minutes to power up, and you should hear the familiar hum of the refrigerator running smoothly.
Why you should clean the condenser coils
Over time, dust, dirt, and debris can accumulate on these coils, hindering their ability to cool the fridge effectively. Neglecting to clean the condenser coils in a mini fridge can have detrimental effects. Dirty coils reduce cooling efficiency by acting as insulation, leading to increased energy consumption.
Additionally, the excess heat buildup puts strain on internal components, potentially causing overheating and system failures. Neglected condenser coils can also result in unstable temperature conditions, leading to food spoilage and unpleasant odors.
Moreover, all this dirt can also shorten the lifespan of the mini fridge by causing irreversible damage to internal components. Therefore, it is crucial to prioritize regular cleaning to maintain the performance and longevity of the mini fridge.
Conclusion: Regularly cleaning the condenser coils in your mini fridge is crucial for its efficient operation and longevity. Follow the step-by-step guide: unplug the fridge, locate and remove the panel or grille, vacuum clean the coils, wipe away dust, reassemble, and plug it back in. Cleaning the coils helps you maintain efficient cooling, and prevents mechanical issues. As a result, cleaning your mini fridge’s coils can help you avoid your food and drinks from getting spoiled. Make it a habit to clean the condenser coils regularly for a clean and well-functioning mini fridge.
Pingback: Are Mini Fridges Noisy? - MiniFridgeZone
Omg thank you for this simple and informative awesome breakdown of mini fridges.
I have owned one mini fridge in my life, and never knew crap about it.
I did know it absolutely needed to regular maintence to keep it from dying an early death, but I always blamed the problems on “the freezer needs to be defrosted, and your fridge will be perfect again.”
Um…SO WRONG.
(I ended up murdering that fridge when I accidentely punctured the thing in the back that kept it cold when I was legit just stabbing carelessly all over the place to get the ice off with a pointed screwdriver.
Yes, murdered it in cold blood.)
Im so happy I know now how to clean the condenser, and the interesting info was so simple to understand, it helped me as ton.
Thank you SO much for helping a totally clueless dummy like myself out.
Thank again!!
I love seeing comments like that! It motivates me to create more content to help you guys out. Thank you for taking the time to comment.
I am glad I could help.
PS: Don’t worry, your fridge murder secret is safe with me! No need to call the fridge police just yet. We’ll keep it our little inside joke. 😄
Pingback: How to Defrost a Mini Fridge - MiniFridgeZone